How to Solve The Rubik's Cube
If you're reading this, you're probably holding a cube in your hand and already feeling bad about yourself for needing to look up the solution. But don't worry! In fact, most of the “super-human-intelligence beings” (a common misconception) who have solved the cube thousands of times in their lifetimes were sitting as you are now. Whether you want to learn it to impress a girl, because your friends bet you couldn't, or just to close the book on the biggest time waste of your childhood by finally defeating it, this guide will take you through the simplest way to conquer the puzzle.
The necessary steps are listed below. Click on a cube to jump on the page to the selected chapter:

An important thing to note is that this task is not a light one. It may require several hours of attempts. If you'd rather just solve the cube in your hand and forget about it rather than being able to solve any cube you're given, there are plenty of solvers available on the web. However, the satisfaction of holding a completed Rubik's Cube in your hand and thinking “I did that, and I can do it again” is greater than most, mainly due to the fact that the puzzle has been present in all our lives at some point. By the mid 1980's, an estimated fifth of the world's population had attempted to solve the cube. If you want to stand out and say that you can defeat the puzzle, time and determination is a large factor.
Notation
If you're still reading, congratulations on not being put off by the time requirements! The first thing you are going to need to know about solving the cube is how the turns you make can be represented by letters. Later on in this guide, you're going to need a few algorithms. These are combinations of moves that rotate pieces or just move them around to get them where you want them. These algorithms are written using this notation, so you can always come back to this section if you've forgotten by the time we need them.
There are six sides on the puzzle, referred to as faces, all of which can be turned individually: Up, Down, Left, Right, Front and Back.
Up – Down – Left – Right – Front – Back
The notation for each of these is U, D, L, R, F and B respectively. These faces can be turned in three different ways/directions, however. These are:
- U – Refers to a clockwise quarter turn of the upper face.
- U' – Refers to a counter-clockwise quarter turn of the upper face
- U2 – Refers to a half turn in either direction of the upper face.
That's it! For a visualisation of each of these turns, click the letters in the animation widget.
There is an advanced notation which includes turns of the middle layers, rotations and “double” turns, but these aren't needed for this guide. If you're still interested in learning them, check them out in the advanced Rubik's notation.
Try it yourself! Take your cube and perform the following short algorithm: U' L R2 D B' F U2 R'
The left, back, and lower faces might be confusing at first when trying to figure out the clockwise direction, but with a little practice you'll get used to it.
Step 1: The Cross
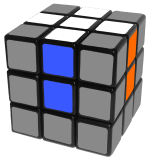
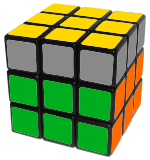
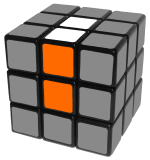
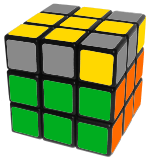
The cross is the first step in the actual solution of the puzzle. This step can be a bit confusing at first, so make sure you read this a few times whilst attempting it yourself. The image shows the end goal of this step.
The centre pieces on each face, as you may have noticed from playing around with the cube, can't be moved to another spot, only rotated. So we can use this to our advantage by building around the centres. The best centre to build your first cross around is the white centre, as many guides and resources on the web start with a white face, so if you need to look up some steps and examples elsewhere, your cube will look similar to the one that is being used in other demonstrations.
The first thing you want to do is get the white plus on top. You don't need to worry about the matching centres (the orange and blue parts of the above image) just yet.
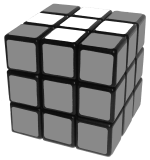
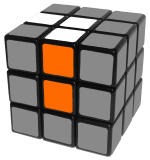
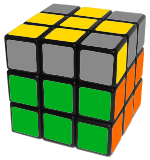
For now, just get each white edge on the top layer. It doesn't matter if the white bit is on top at the moment. For example, your cube could look like the one pictured. It doesn't matter if all of the white bits are facing up or none of them are.
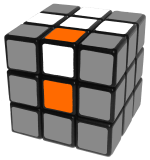
The next step is to flip some of the edges so all of the white stickers face upwards, making a plus (pictured above). If your cube already has the cross, skip this part. Hold the cube so that one of the edges that needs to be flipped is facing you.
Then apply this algorithm: F R' D' R F2
This algorithm will flip the edge so the white part is facing upwards. Do this for every edge until you have a white cross on top.
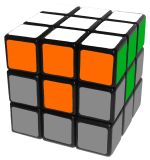
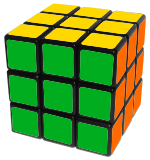
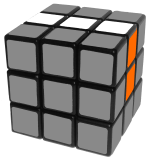
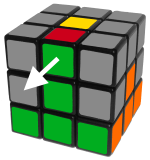
Now you need to orient these pieces. Refer to the next picture. As you can see, the orange piece matches the orange centre. Look at the edges on your puzzle. You could have none matching, two matching or all matching. If you have all four edges matching the centres, your cross is solved. If you have none matching, perform a U move, then look around the cube again. You want to have at least two matching. If none of them match, do another U move. Repeat until you have either two or four edges matching their centres.
Your goal is to have all four edges matching their centres. If you have this, then the cross is solved. If you have only two, then you could have one of two cases. Either the two matching edges are adjacent (next to each other) or opposite each other. If they are adjacent, hold the cube so that the two solved pieces are facing the front and left of the cube (shown in the left picture), then perform:
R' U R U' R'
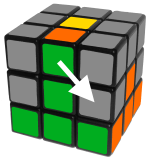
If the two matching edges are opposite one another, hold the cube so that they are on the left and right faces (shown in the right picture) and perform the following algorithm to swap the one in the back and in the front:
R2 L2 U2 R2 L2
Your cross is now solved!
Step 2: The White Corners
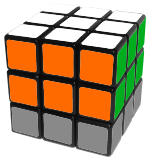
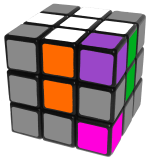
Now you've done the edges on the white face, all that's left are the corners. This step is much simpler, as it only requires one algorithm. The picture shows the end goal of this step.
Look on the bottom layer of the puzzle. You're looking for the white-orange-green corner. There is a 50% chance it will be on the bottom layer. Follow the following steps depending on where the corner is for you.
Bottom
If the corner is on the bottom of the puzzle, perform the required D moves so that the corner is in the position marked in pink on the picture. Perform this algorithm as many times as is needed to put the corner in its place:
R' D' R D
Top
If the corner is on the top of the puzzle, hold the cube so that the corner is in the position marked in purple on the image, and perform the same algorithm as before:
R' D' R D
Now the corner is on the bottom, so you can do the above instructions.
Repeat this process for each corner until the top layer is solved. I suggest you to start with the corners in the bottom layer because solving these first might pop out some white pieces from the top layer and you might save a couple turns.
Step 3: Middle Layer Edges
You're 1/3 done (kinda)! You're done with all white pieces, so you can now flip your cube so white is on the bottom.
Look for an edge that is on the top face and doesn't have yellow on it. There's a very small chance that there won't be any, but there are instructions for that case below. Perform a U move so that the colour on the front face of the edge is matching with the centre. There are two directions that the edge could go, left or right.
Left:
If the edge needs to go in the gap to the left of it perform the following algorithm:
U' L' U L U F U' F'
Right:
If the edge needs to go in the gap to the right of it do this:
U R U' R' U' F' U F
If there are no more edges left on the top layer, then they are probably either inserted in the right place but flipped, or inserted in the wrong place. To get an edge out of somewhere it shouldn't be, just insert one of the yellow edges into that slot. This should get the edge out and on the top layer, ready for you to use the above instructions to insert correctly.
Repeat this process for all four middle edges.
Step 4: Yellow Cross
We're nearly there now. 2/3 of the puzzle is solved, and every piece left to be solved has yellow on it somewhere. That's a good sign… right?
We're going to solve the top layer edges in two steps. In this step will orient all of the pieces so that the yellow face is facing up for all of them. The next will move these pieces around and thus solve the cube.
Ignore the corners for now. You want to look at the edges only. Either none, all, or two of the edges will already be oriented correctly (the yellow part is facing up).
These are the four possible edge positions that you can have:
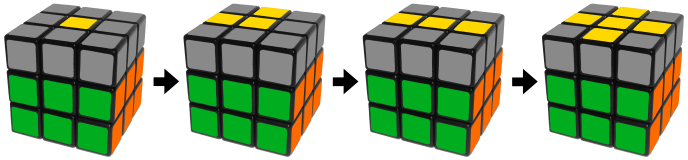
Do this to transfrom to the next state: F R U R' U' F'
If the edges are solved in a plus shape like the cross we made at the start (the last image), you can skip this stage.
Beside the solved cross you can also have a “Dot”, an “L” shape or a “Line” as pictured above. To transform the Magic Cube from one state to the other, you have to apply the following short algorithm, watching out for the L shape and the line to be positioned as required:
F R U R' U' F'
If you are in a hurry you can speed up the process by doing two jumps at once with this:
F U R U' R' F'
When you have an “L” shape, where the two yellow pieces showing are adjacent one another. Do the required number of U or U' moves to get this L as shown in the picture: the corner that the two edges trap needs to be in the top left. Then perform this algorithm:
F U R U' R' F'
If done correctly, you should now be looking at the yellow cross.
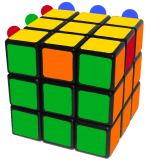
The third image shows the “Line” shape, where the two yellow pieces showing are opposite one another. Make sure that the yellow bar (the two edges and the middle sticker) is horizontal, then do:
F R U R' U' F'
You should now be looking at four edges all oriented correctly.
For the “Dot” case shown in the first picture, just do either of these algorithms to get a different case.
Step 5: Sune and Antisune
Sune is a very simple algorithm that many puzzlers love due to its simplicity compared to other algorithms that they may have had to learn. There are 7 different corner positions possible after you have oriented the edges. Sune and Antisune are two of these, but we won't always get them straight away.
Refer to the image to see what they look like. Both Sune and Antisune have one correctly oriented corner. You might have two corners oriented or none oriented. If you have all four already facing upwards, you don't need this step.
To get to the case where you only have one oriented corner, repeat the following algorithm:
R U R' U R U2 R'
When you eventually get the desired position, there are two slightly different variations of it. For this, we need to look at the front of the cube. The yellow corner facing the front can be in two positions: Either facing the front, or facing the right. In the first image, it is facing the front. This shows you have Sune. To solve it, just do the above algorithm one more time, and you should have oriented all of the top layer.
Antisune is indicated when the corner facing the right, as shown in the second picture:
U2 R U2 R' U' R U' R'
Sune and antisune
Step 6: Finishing the puzzle
We're nearly there! Last part now.
Here, we're looking at the colours that aren't solved. There are 21 different cases for the top layer, but we only need a couple of algorithms to solve them all. The first thing we want to find is headlights. Only 2 of the cases don't have any headlights (one of them is if you skip this step, and the cube is already solved). For the one case without headlights, just perform the algorithm below from any angle. This is a better case because when you do the next step, the cube will be solved already.
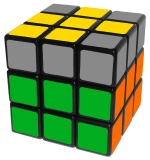
Headlights are fairly simple to spot. Looking at the image, we can see on the right hand side that the orange edge has a green corner on either side of it. That is a set of headlights. The left hand side has two different colours on either side, so that is not a set of headlights. It is very important to note that a full bar (a blue edge has a blue corner on either side of it, so all three pieces are blue) is also seen as a set of headlights. This is only seen in one case of the 21 though, so you won't see it often. If you have a set of headlights on each side, ignore this part and read the section titled “The U Permutation”.

Headlights: two corners having the same colour on one side
You want to hold the cube so that the set of headlights is facing away from you (do the required number of U moves so that the headlights aren't on the front, left or right). Then, do the following algorithm:
R' F R' B2 R F' R' B2 R2
You should now have either a solved cube or a pair of headlights on all sides.
The U Permutation
There are 5 different positions your cube can be in now, one of which could be solved. The rest of them have all four corners solved, so do the required amount of U moves so that every corner is in its right place. 2 of the 4 remaining possibilities have a solved bar (as mentioned above, where all three colours on that side are the same), and the other 2 have no solved bars.
If you have a solved bar, put it at the back and do this algorithm:
R U' R U R U R U' R' U' R2
If your cube isn't solved, do it one more time, making sure the bar is still at the back.
If you don't have a solved bar, do the same algorithm from any angle. This will leave you with a solved bar, so you can do the above.
Congratulations! You've solved the Rubik's Cube. Wasn't that hard, was it?
This tutorial didn't help you?
Read the beginner's Rubik's guide or go to the Rubik's Cube solver and let the program calculate the solution for you.